
In a previous blog post I ran through a example of how to use the new command line compiler feature of PowerBuilder 2017 to perform continuous integration using Jenkins and a Git repository. One of the "next steps" I referenced in the close of that post was the creation of a plug-in for Jenkins that would make creating the build steps for the project much simpler.
Well, I've created such a plugin. Or more specifically what I did was take the existing MSBuild plugin and customize it to create a number of plugins to do PowerBuilder compiles instead.
In this post I'm going to look at how we can use those plugins, plus some additional changes I've made to the project in Jenkins to make better use of the capability of Jenkins and other Jenkin plugins.
Download and install the Oracscript and PBCompile plugins
The first thing you'll need to do is grab a copy of the OrcaScript and PBCompile plugins. What you'll need is the orcascript.hpi and pbcompile.hpi files. There are different versions depending on the version of PowerBuilder you are using
| Orcascript | PBCompile | |
| 2017 |
orcascript-plugin-2017 |
pbcompile-plugin-2017 |
| 2019 |
orcascript-plugin-2019 |
pbc_compile-plugin-2019 |
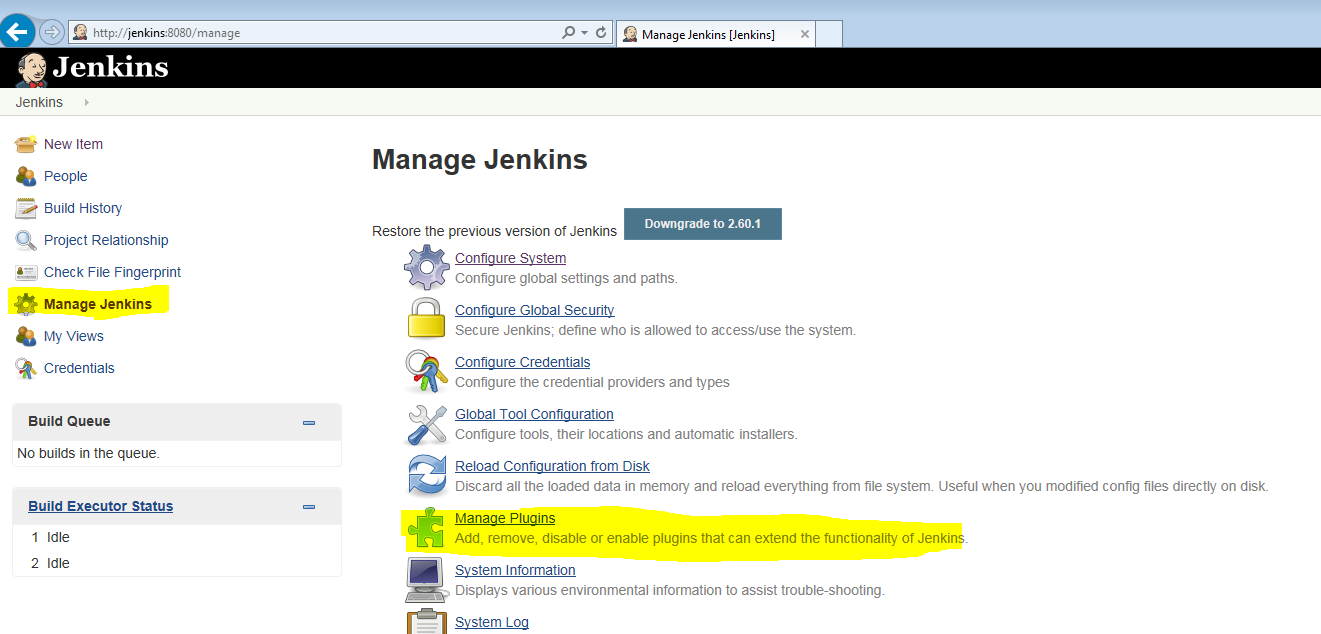
Go into Jenkins and select the "Manage Jenkins" option, and then the "Manage Plugins" link on that page.
On the Plugin Manager page select "Advanced" and then look for the "Upload Plugin" section. Click the "Browse" button there and navigate one of the HPI files you downloaded.
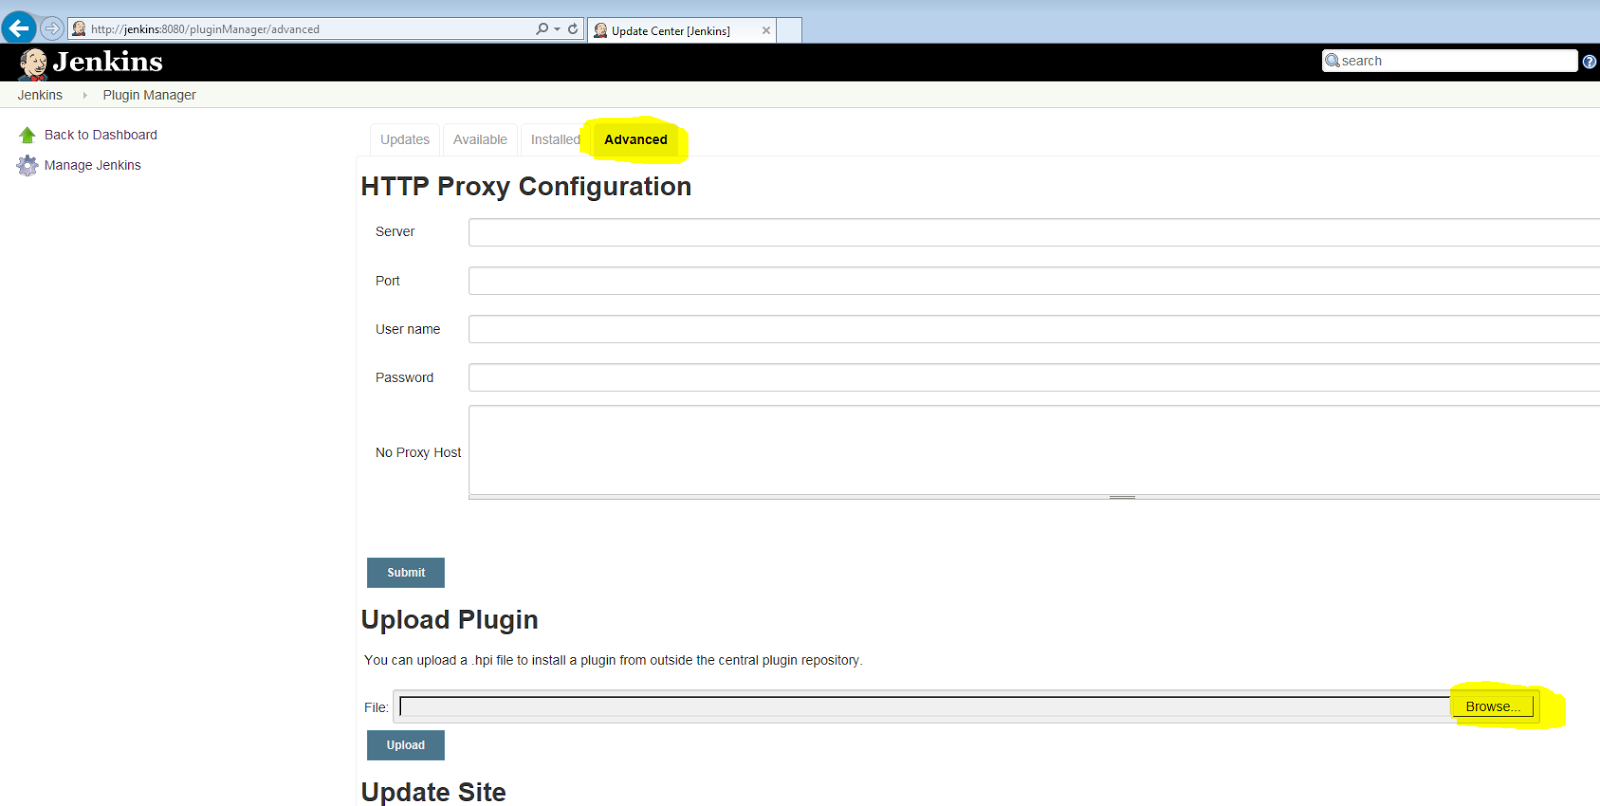
Do it again for the second HPI file. You'll may need to restart the Jenkins server after installing the plugins before you can use them.
Configure the plugin installations
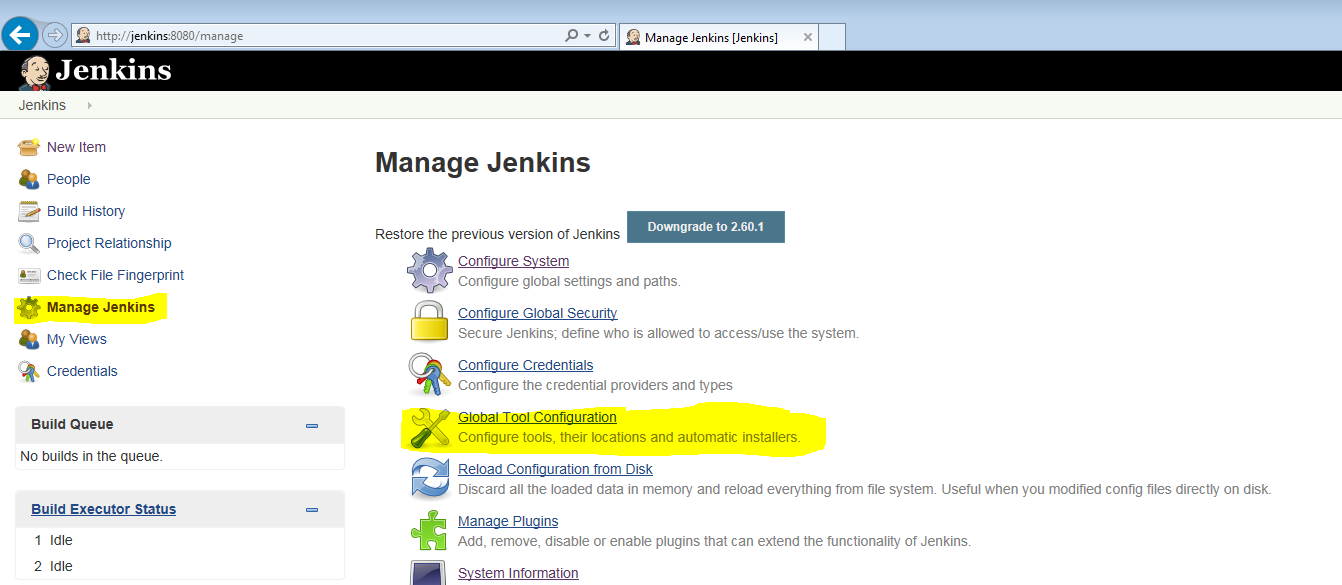
After the server has been restarted go back into "Manage Jenkins" and then "Global Tool Configuration".
Scroll down that page an you'll see a new "Orcascript" section. Select the "Add OrcaScript" button.
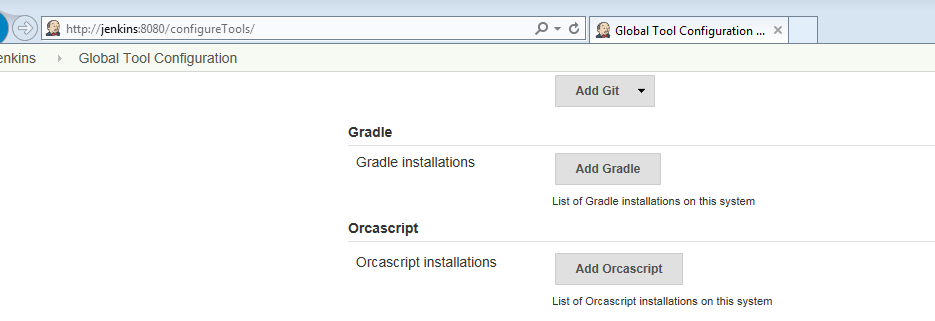
In the form that appears, provide the installation with a name and the path to the OrcaScript executable (orcascript170.exe, or orcascript190.exe).

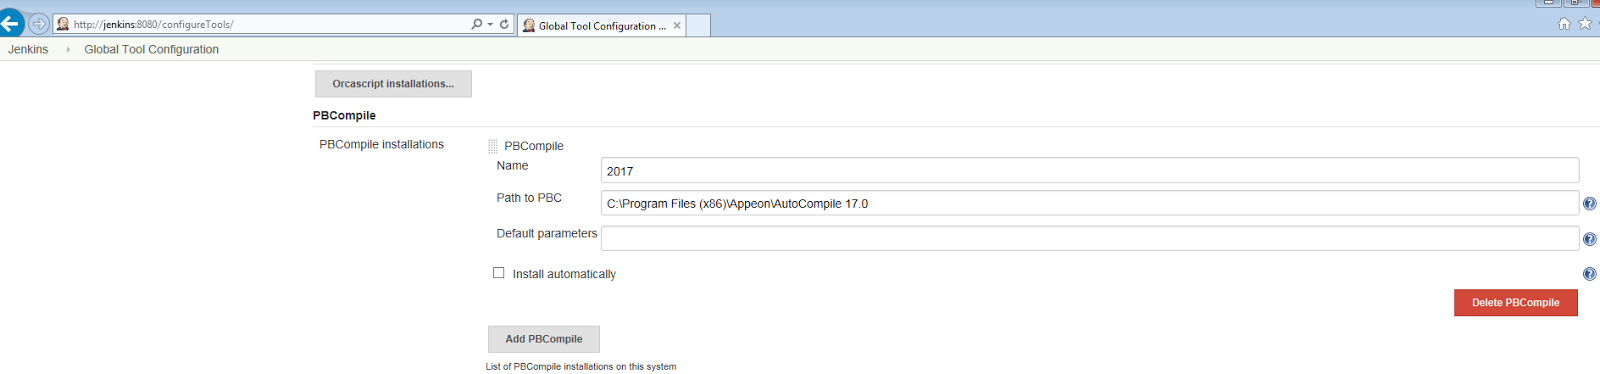
Scroll down the page a bit more and you will see a new "PBCompile" section. Select the "Add PBCompile" button as before. In the form that appears,provide the installation with a name and the path to the PowerBuilder command line compiler (pbc170.exe or pb190.exe).
Create OrcaScript and PBCompile build steps
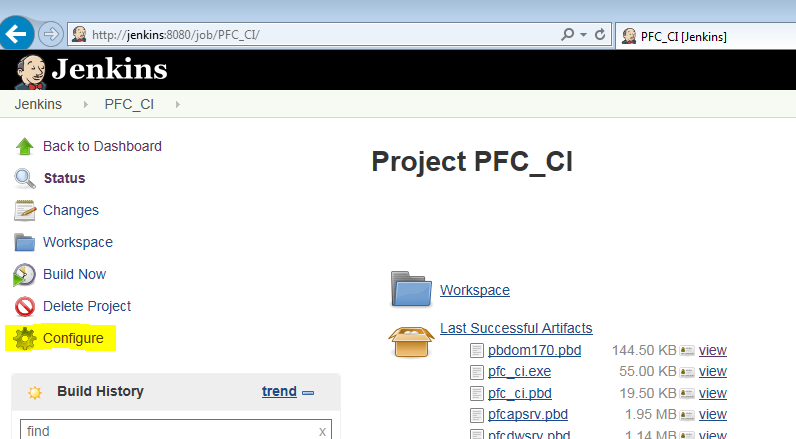
Go back into your PowerBuilder project and select the "Configure" link.
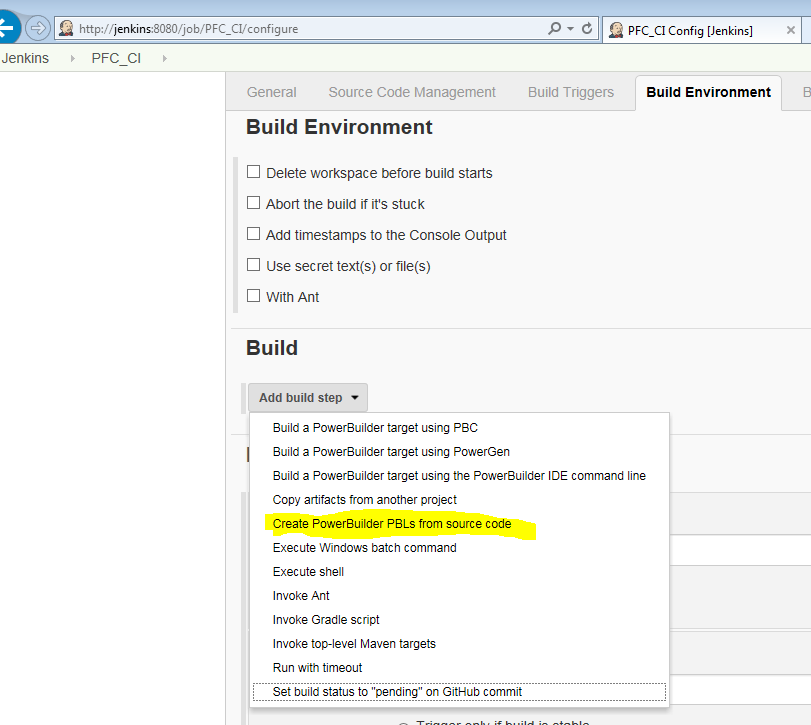
Delete all the previous build steps that called batch files. Now add a new one and notice a new entitled "Create PowerBuilder PBLs from source code". Select that one.
In the form that appears, select the version of the OrcaScript installation you just created and provide the relative location to the PowerBuilder project file. If you have PBDs in the library path that you want OrcaScript to ignore, provide them in the Exclude Liblist option. The open source PFC contains a reference to the PBDOM PBD, so we're excluding that here.

Add another build step and this time select the "Build a PowerBuilder target using PBC" option.

In the form that appears, select the version of the PBCompile that you just created earlier.
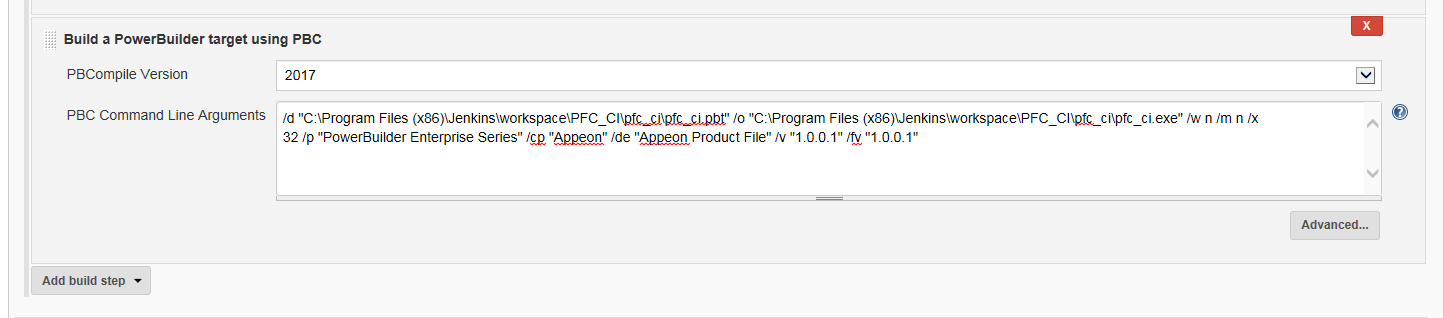
You'll also need to add the command line arguments to pass to the PowerBuilder Autocompile utility. You can get those from the first page of the project object in your PowerBuilder target.
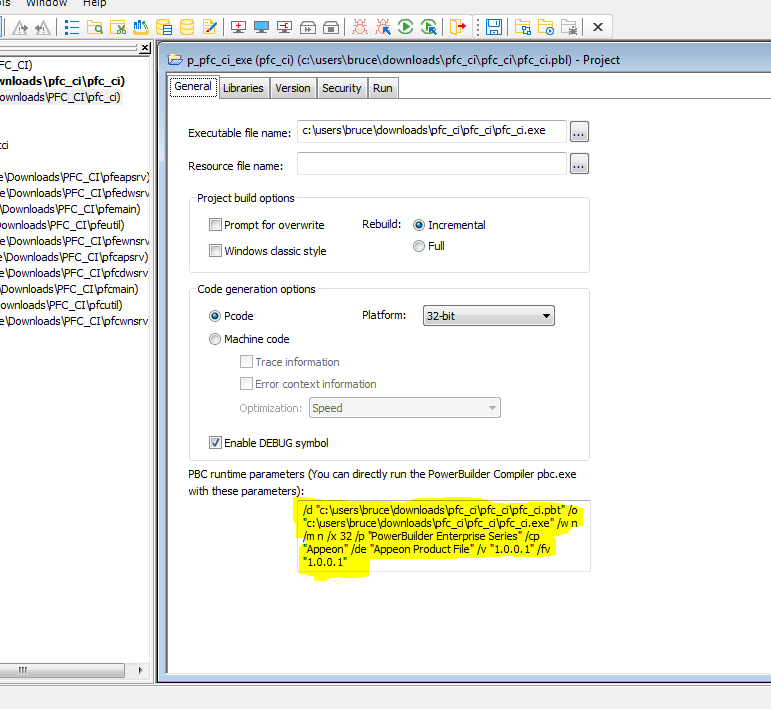
hese plugins provide the same capability as the first two batch files from the previous blog article, namely running OrcaScript to create PBLs from source control and then running the AutoCompile Utility (PBC170.exe) to create the executables and PBD from the PBLs.
Archive the Project Artifacts
What we're going to do now is replace the third batch file, the one that copies the EXE and PBDs into the build folder. Jenkins has some built in capabilities that make this simpler that I didn't demonstrate in the previous article.
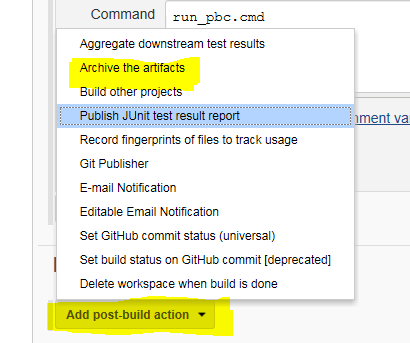
The first thing we're going to do is to tell Jenkins to archive off the EXE and PBDs (Jenkins calls them "artifacts"). To do this, create a Post Build step and select "Archive the Artifacts"
In the new step that is added, enter the following in for the "Files to Archive".
**/*exe, **/*.pbd
The syntax is Apache Ant include fileset. This particular setting tells Jenkins to find all of the EXE and PBD files in the workspace - including in any subdirectories - and copy them into the archive location. When it does so it preserves the subdirectory structure, something we'll deal with in the next step.

Install the Copy Artifacts plugin
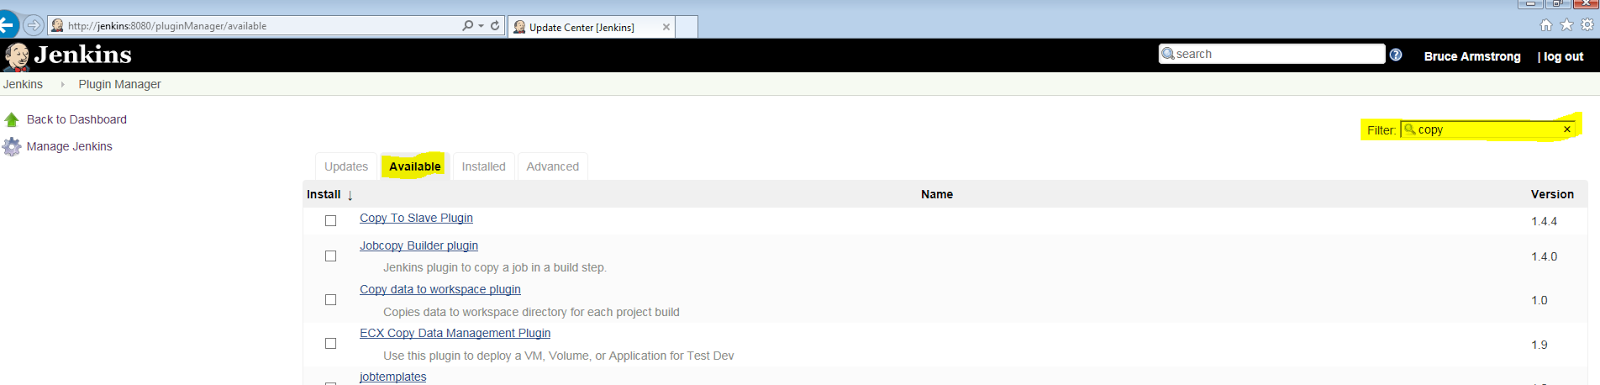
Now that we have the PBDs and EXE in the archive location, we want to use the Copy Artifacts Plugin to copy them to the build folder. First we'll need to install the plugin. Go back to the Manage Jenkins -> Manage Plugins page, but this time select the "Available" tab. Because there are a lot of plugins for Jenkins you might want to use the Filter option in the upper right to pear down the list.
Once again you'll need to restart the server before you can use the plugin.
Create a Copy Artifacts project
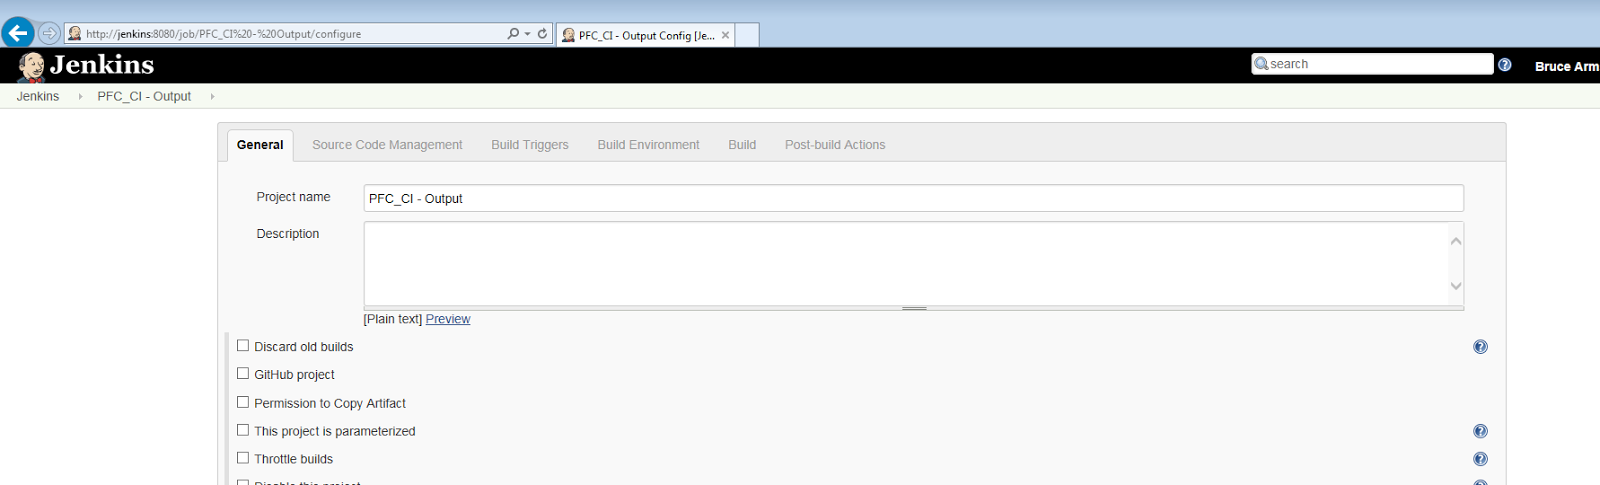
After the server has been restarted, create a new project. We'll fire this project off after the build is complete from our original PowerBuilder project. You might simply name the new project as the original project name with an " - Output" suffix, as I've done here.
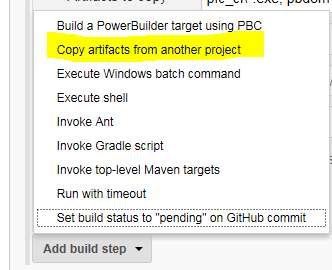
The only thing we're going to do with this new project is create one build step. Do that, and choose the new "Copy artifacts from another project" option.
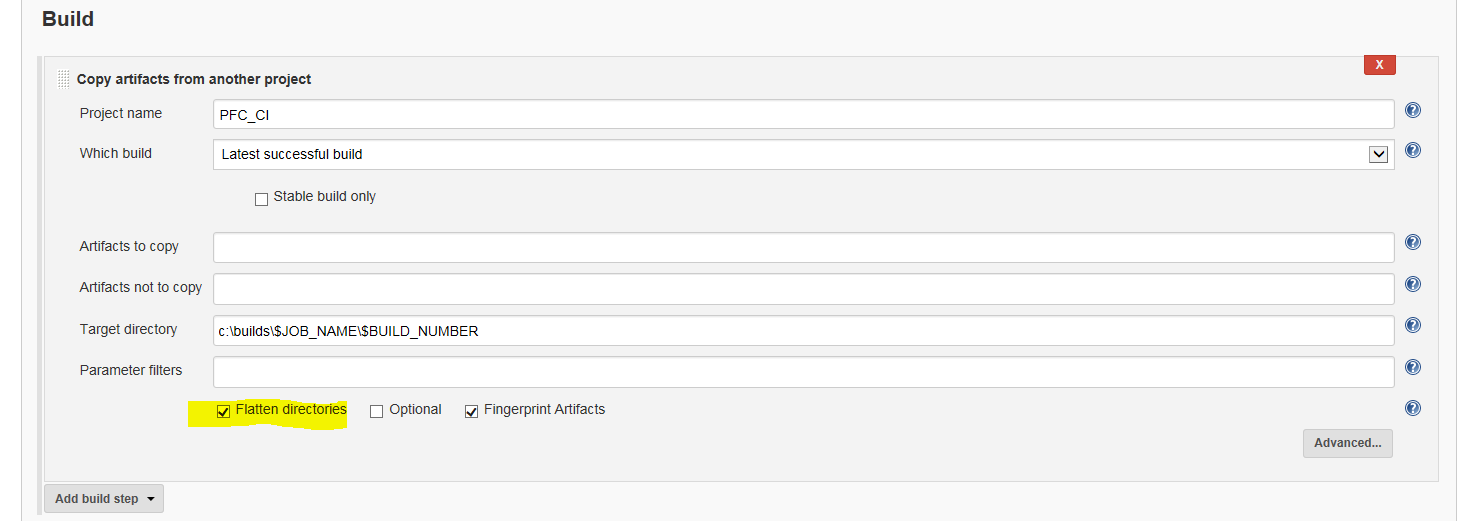
- Project to Copy From: Select your original PowerBuilder project.
- Artifacts to Copy: You can leave this blank, as it defaults to copying all artifacts.
- Target Directory: The he location you want the files copied to, and can reference the Jenkins environmental variables using $VARIABLENAME (as opposed to %VARIABLENAME% that we used in the batch files). For example, I'm using:
c:\builds\$JOB_NAME\$BUILD_NUMBER
In the previous article I was concatenating the job_name and build_number for the directory. I like this better as I'm now putting the builds in subdirectories under the job name.
- Flatten Directories: The one other option you will want to change is to check the "Flatten Directories" option. That tells the plugin to just copy over the EXE and PBD files and ignore the subdirectory structure.
Create a Post Build step to fire the Copy Artifacts project
Go back into the original PowerBuilder project. We need to add another Post Build step. This time select "Build other projects".
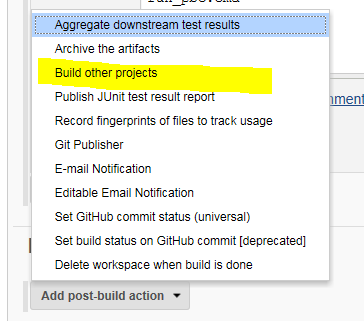
And in the new post build step specify your "output" project as the project to run after the PowerBuilder project completes.

Test the new configuration
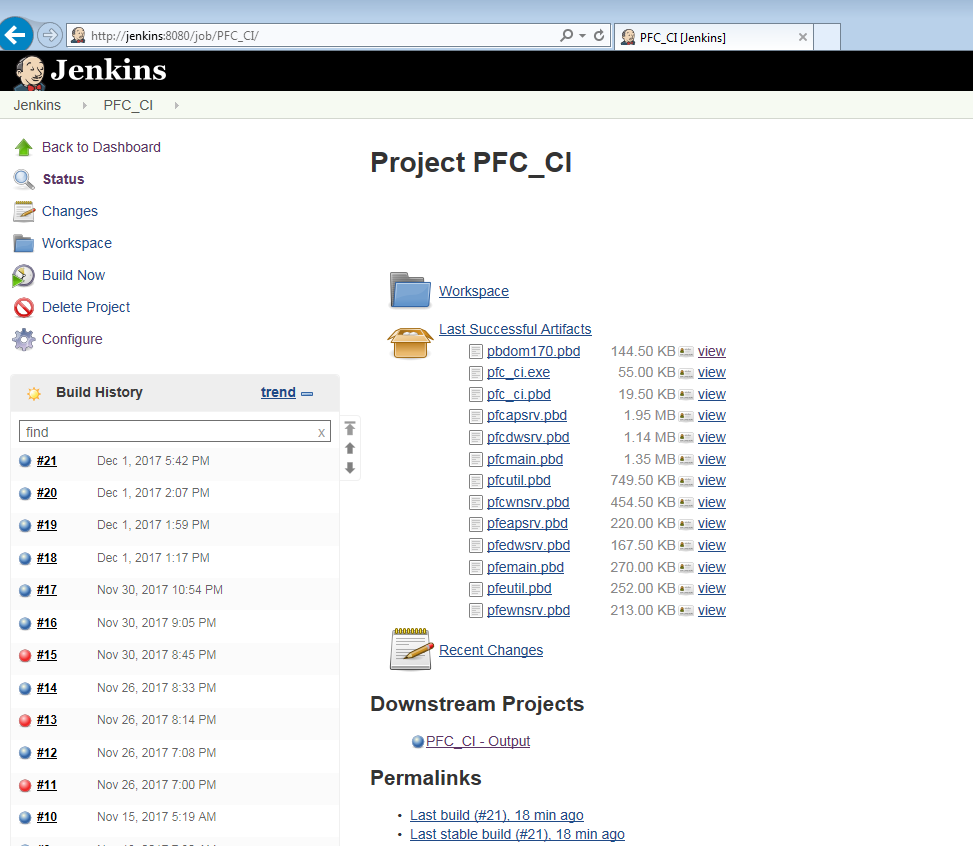
Run a build of your PowerBuilder project just to verify that it's all working. You'll notice some differences. In particular, the build information now shows the artifacts that were created and the "output" project as a "Downstream Project".
The build information from the "output" project isn't particularly interesting, but we can check out build folder and see that the build files are being created and stored correctly.

Caveats
This all works great. The only issue is that (currently) there are a number of options available in the PowerBuilder target that aren't supported by the command line arguments for the PowerBuilder autocompiler. Well we have some other options. One is to user PowerGen, and the other is to use the command line options of the PowerBuilder IDE itself. Fortunately, I also created a plugin for each of those as well. (That was true when this article was originally published. It was addressed in later releases of PowerBuilder.)
PowerGen plugin
If you'd like to use PowerGen instead, grab a copy of the PowerGen plugin. You'll need the powergencompile.hpi. Install it as you did the other two plugins above. Similarly, go to the Global Tool Configuration and create a PowergenCompile installation.
| PowerGen version | |
| 9.5 (2017 and below) |
powergen-plugin-2017 |
| 10.0 (2019 and below) |

Like the other two plugins, the only thing you need to do here is give the installation a name and provide a path to the PowerGen executable (Pwrgn17.exe).
Go back into your project, delete the PBCompile step and add instead a PowerGen step.

And in the form that appears there selection the install you just created and the relative location of the PowerGen project file you've created for the project.

You'll need to save or copy that PowerGen project file in the workspace.
Caveats
There's a couple of caveats with this approach as well though, both of which I've shared with the folks who make PowerGen.
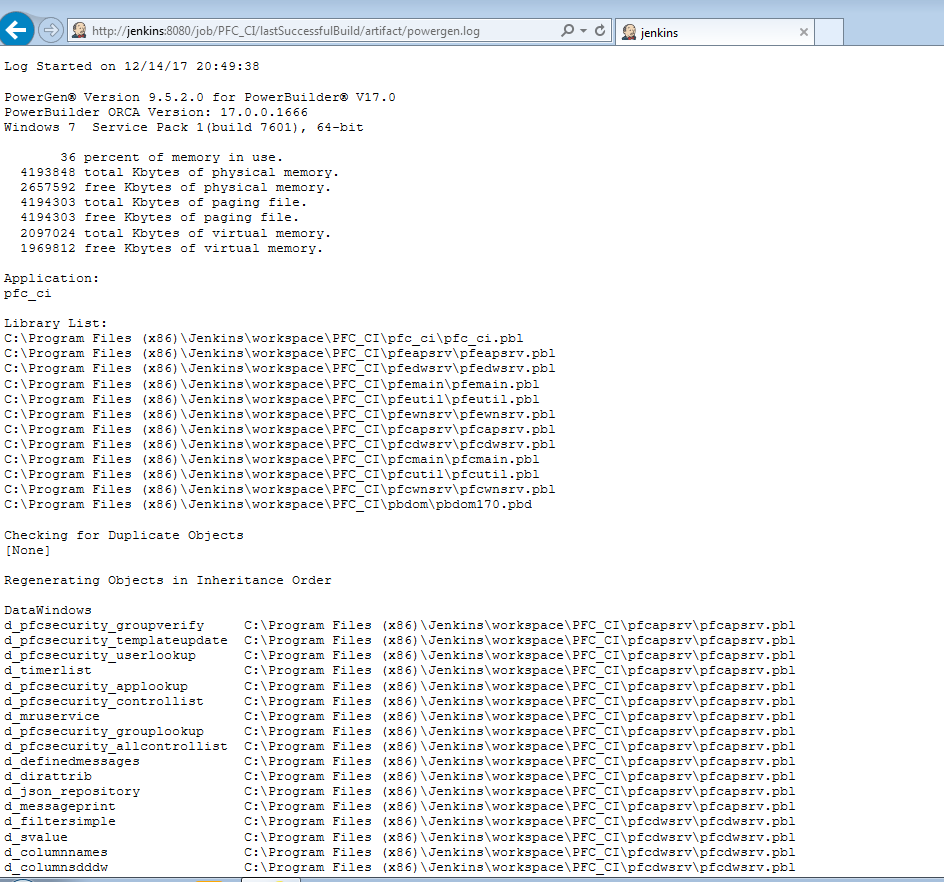
- PowerGen doesn't output to the console. The other utilities we've used so far do, and it's useful for following the progress of a build. Instead, PowerGen (if the project file is configured for it) outputs to a log file. What I've done is added *.log to the artifacts. As a result, the log file PowerGen generates appears in the project summary page and I can click on it to display it after the build.


- Powergen doesn't indicate build errors by returning a non-zero exit code. Instead, when there are errors it writes out a pgerror.log file. However, a non-zero exit code (also often referred to as an ERRORLEVEL code) is what Jenkins is looking for from such tools to indicate when their task has failed. It's certainly possible that from within the plugin I could look for the existence of a pgerror.log and flag the task as failing. However, in the long run I think it would be cleaner if PowerGen could update its behavior to include the non-zero exit code.
(The above was true at the time the article was originally written. PowerGen was later revised to address those caveats).
Note that PowerGen also has the capability to generate PBLs from source code like OrcaScript does. I haven't looking into making use of that capability as I already have OrcaScript doing that for me.
PowerBuilder IDE Plugin
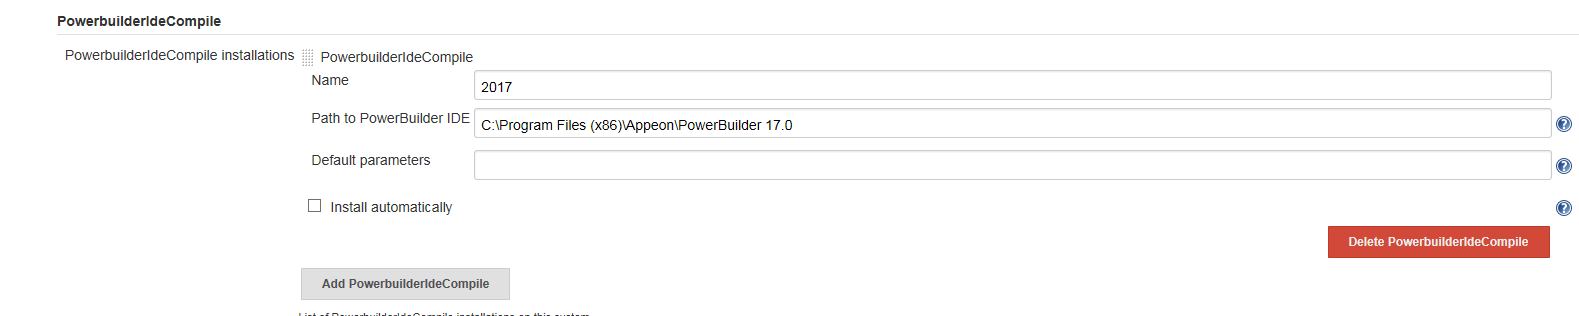
The last option is to use the PowerBuilder IDE itself to do the compile using command line arguments. To do that, grab a copy of the PowerBuilder IDE plugin. You'll need the pbidecompile.hpi file. Install it as you did the others, and then go into Global Tool Configuration and give it a name and the location of the PowerBuilder IDE.
| PowerBuilder IDE version | |
| 2017 |
pbide-plugin-2017 |
| 2019 |
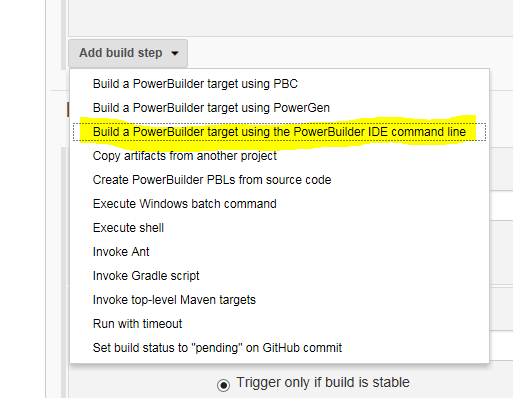
Go back and replace that last build step with the new "Build a PowerBuilder target with the PowerBuilder IDE command line" option that appears.
And in the form that appears, select the version of the install you just created and indicate the relative location of both the workspace and project file.

Note that the workspace file is a new requirement, and something that isn't part of the source pulled over from the source control server. You'll have to copy or create a workspace file in the Jenkins workspace in order to use the PowerBuilder IDE command line approach.
Caveats
- You have to purchase an additional license of the PowerBuilder IDE and install it on the build machine for this option.
- Like PowerGen, The PowerBuilder IDE doesn't output to the console. So, like PowerGen, we write the output from the IDE to a log file.
- You need to copy or create a PBW file for the workspace, as the PBW file isn't one of the source controlled objects.
- It appears that problems generating a build don't cause the IDE to exit with an error code. In fact, it seems to prevent the IDE from exiting entirely. Instead, the build appears to hang as the IDE waits for user interaction.
Comments (24)