Addressing the complexities of PBNI
PowerBuilder Native Interface (PBNI) allows developers to extend the capabilities of PowerBuilder by implementing features in C++ or using third-party libraries. However, the traditional process for creating these extensions can be cumbersome.
For a simple sum function with 9 lines of code...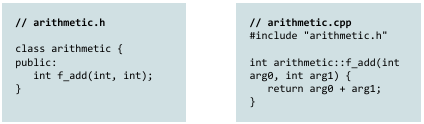
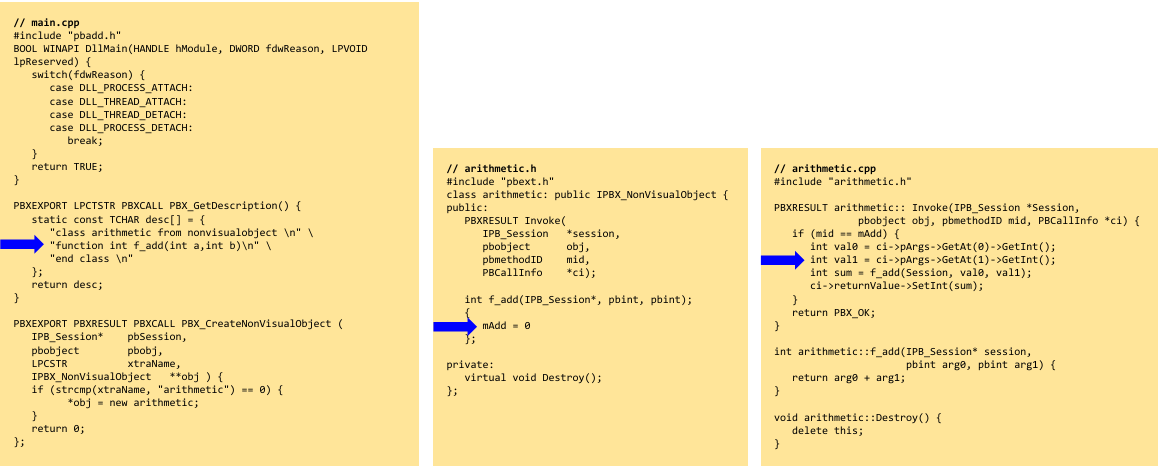
... you have to write 63 lines of code just to make it callable from PowerBuilder and for every change, you have to make PB-specific modifications in three files:
A more efficient approach
The PBNI framework introduces a more streamlined development experience. By leveraging the framework, developers can focus on the core logic of their extensions without being bogged down by the repetitive setup and boilerplate code inherent in traditional PBNI development. The framework handles much of the underlying plumbing, allowing for a cleaner and more maintainable codebase.
For example, where previously developers would need to manually implement the PBX_GetDescription, PBX_CreateNonVisualObject, and Invoke functions, the framework simplifies this with a class registration macro.
Without the framework:
// main.cpp
PBXEXPORT LPCTSTR PBXCALL PBX_GetDescription() {
   static const TCHAR desc[] = {
      "class arithmetic from nonvisualobject \n" \
      "function int f_add(int a,int b)\n" \
      "end class \n"
   };
   return desc;
}

PBXEXPORT PBXRESULT PBXCALL PBX_CreateNonVisualObject (
   IPB_Session* pbSession,
   pbobject        pbobj,
   LPCSTR          xtraName,
   IPBX_NonVisualObject   **obj ) {
   if (strcmp(xtraName, "arithmetic") == 0) {
         *obj = new arithmetic;
   }
   return 0;
};
With the framework:
// arithmetic.cpp
#include "arithmetic.h"

namespace Inf {
  INF_REGISTER_CLASS(arithmetic, L"u_pbni_arithmetic");

  INF_REGISTER_FUNC(f_add, L"of_add", L"ai_left", L"ai_right");
  PBInt arithmetic::f_add(PBInt arg0, PBInt arg1) {
    return arg0 + arg1;
  };
}
This approach significantly reduces the amount of code required and centralizes the registration of classes and functions, making the development process faster and less error-prone.
Quick start
This guide will help you set up your environment to build your first PBNI extension using the framework template.
Prerequisites
First, ensure you have the following tools installed:
- PowerBuilder 2022 R3 (also compatible with other versions)
- Visual Studio (MSBuild): https://visualstudio.microsoft.com/
- CMake: https://cmake.org/
- Conan: https://conan.io/
Setup conan
- If PowerBuilder is not installed in the default path (
C:/Program Files (x86)/Appeon), you must set an environment variablePB_DIRECTORYthat points to the corresponding directory. - Add the Informaticon remote repository by running this command in your terminal:
conan remote add inf-conan https://artifactory.informaticon.com/artifactory/api/conan/conan - Have Conan detect your default environment settings:
conan profile detect - Change the default Conan profile (usually found at
%userprofile%/.conan2/profiles/default) or create a new one with the following settings. This profile tells Conan to build for a 32-bit architecture and specifies compiler settings.# %userprofile%/.conan2/profiles/default [settings] arch=x86 # change this to x86_64 for 64bit builds build_type=Debug # change this to MinSizeRel for release builds compiler=msvc compiler.cppstd=20 compiler.runtime=static compiler.version=194 # Corresponds to MSVC v143 (VS 2022) os=Windows [options] *:pb_version=22.0 # Change this to 25.0 to use PowerBuilder 2025
Code the extension
With your environment configured, you can now build the extension.
- Clone the template repository.
- Modify the project for your needs / program your library:
- Create a
.cppand an.hfile in thesrcdirectory containing your C++ code.// arithmetic.h (example) namespace Inf { class arithmetic : public PBNI_Class { public: PBInt f_add(PBInt, PBInt); }; }// arithmetic.cpp (example) #include "arithmetic.h" namespace Inf { INF_REGISTER_CLASS(arithmetic, L"u_pbni_arithmetic"); INF_REGISTER_FUNC(f_add, L"of_add", L"ai_left", L"ai_right"); PBInt arithmetic::f_add(PBInt arg0, PBInt arg1) { return arg0 + arg1; } } - In the
CMakeLists.txtfile, replace°°°PACKAGE_NAME°°°with your desired project name. - In the
CMakeLists.txtfile, replace°°°SOURCE_FILES°°°with the relative paths to your source files.
add_library(${PROJECT_NAME} SHARED
	src/arithmetic.cpp
	src/arithmetic.h
)
- Create a
Build the extension
- Install the required dependencies using Conan. This may take some time on the first run as it downloads and builds the necessary libraries.
conan install . --build=missing - Generate the Visual Studio project files using CMake:
cmake --preset conan-default - Build the PBNI extension:
conan build . --build=missing
Use the extension in PowerBuilder
- Add the Informaticon Exception Framework to you project:
- Download the latest release from Github (e.g. lib.pb.base.exception-framework@1.2.3+pb22-x86-minsizerel.zip for PB2022R3).
- Unzip
exf1.dllandexf1.pblinto you PowerBuilder project folder. - Add
exf1.pblto your library list. - Integrate the exception framework in the application object:
// Global variables
u_exf_error_manager gu_e

// open() event
gu_e = create u_exf_error_manager

// systemerror() event
gu_e.of_display(gu_e.of_new_error() &
	.of_set_nested_error(gu_e.of_get_last_error()) &
	.of_push(1 /*populateerror()-Return*/) &
	.of_set_message('systemerror occured') &
	.of_push('Notice', 'Nested error may be unrelated to this system error.') &
	.of_set_type('u_exf_re_systemerror'))
halt
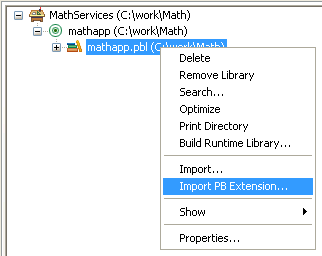
- Finally, import the freshly built PBNI dll file into PowerBuilder. You can find it in the build directory, for example:
./out/MinSizeRel/my_project.dll:
Further reading
To learn more, explore the framework and its usage with these resources:
- Main Repository: The core framework is available on GitHub at https://github.com/informaticon/cpp-pbni-framework.
- Usage Example: A practical example of how to use the framework can be found at https://github.com/informaticon/cpp-pbni-framework-usage-example.
- Template Repository: To quickly start a new project, use the template at https://github.com/informaticon/cpp-pbni-extension-template.
Informaticon has already utilized this framework to develop a range of PowerBuilder extensions, including tools for picture manipulation, QR code generation, and an advanced email and HTTP client. While these specific extensions are not yet open source, the underlying PBNI Framework is available under MIT license for the community to use in their own projects.
Exception Handling
The framework relies heavily on exception handling, each function declares a throws clause.
This is to force us to perform appropriate error handling:
u_pbni_arithmetic lu_arithmetic; lu_arithmetic = create u_pbni_arithmetic
long ll_result

try
	ll_result = lu_arithmetic.of_add(1, 2)
catch (u_exf_ex lu_e)
	// handle the error, e.g.
	// - Rollback the current transaction
	// - Retry
	// - Re-throw the exception to the caller or declare the
	//   exception in your own throws statement
	// - Display it: gu_e.of_display(lu_e)
end try
If you are new to this topic, read this:
- Appeon documentation: Exception handling in PowerBuilder
- Informaticon Exception Framework Documentation: github.com/informaticon/pb-exception-framework
- Exception Handling Introduction Video: Elevate 2024 presentation
Why PBNI remains essential alongside .NET integration
While PowerBuilder's .NET integration is powerful, the PBNI framework offers a fundamentally different and more direct level of integration. Its key advantage is the ability to communicate directly with the PowerBuilder Virtual Machine (PBVM). This allows developers to create custom extensions that behave like native PowerBuilder components, providing a feature set for deep integration and fine-grained control that is distinct from the .NET import functionality.
Comments (0)