
QRCoder is an open source .Net assembly for creating QR Codes. What we're going to do is wrap that with an assembly in SnapDevelop we can use from PowerBuilder. First thing we need to do is create a .Net standard Class Library project in SnapDevelop.
Once we've done that we go into the Nuget Package Manager and install the QRCoder library.
In our wrapper assembly, we just need to add a few lines of code
 public string GenerateQRCode(string qrText)
     {
       QRCodeGenerator qRCodeGenerator = new QRCodeGenerator();
       QRCodeData qRCodeData = qRCodeGenerator.CreateQrCode(qrText, QRCodeGenerator.ECCLevel.Q);
       PngByteQRCode pngByteQRCode = new PngByteQRCode(qRCodeData);
       byte[] qrCodeBytes = pngByteQRCode.GetGraphic(20);
       string qrCodeString = Convert.ToBase64String(qrCodeBytes);
       return qrCodeString;
     }
A couple of things to note here. first, if you look at the QRCoder documentation the sample they give involves the base QRCode class and converts the result to a bitmap. Since I want to pass this back to PowerBuilder as a byte array or, as I've done here, as a Base64 encoded string, converting the result is a bitmap first is an intermediate step I don't want or need. So I used the PngByteQRCode class instead to get a byte array Second, I am converting the byte array to a Base64 string. You can return a byte array directly from the assembly, and the .Net Importer will convert it to a blob automatically. The issue is that for debugging purposes I can't see inside of a blob variable in the PowerBuilder debugger. So if something goes wrong I'm not sure what I got back. By passing back a Base64 encoded string to PowerBuilder and then converting it to a blob in PowerScript I have better insight when debugging.
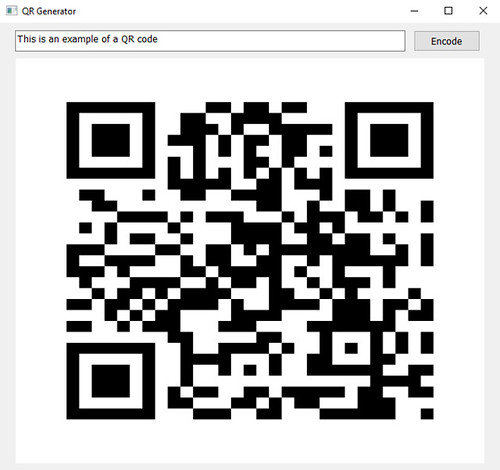
After you've compiled that, lets switch over to PowerBuilder 2019 R3 and use it. I created an target that contains a window that has a single line edit (sle_1) to enter text, a picture control (p_1_ to display the bitmap and a command button to run the script needed to generate the QR code image using the assembly. Now we need to run the .Net Assembly importer to import our wrapper assembly.
As usual with a window this is going to call a .net assembly using the importer I do the following in order to facilitate error handling.
1. Declare the .net assembly wrapper object as an instance variable on the window
nvo_qrgenerator inv_generator
2. Instantiate the wrapper object in the open event and register the error handler to an event on the window
 inv_generator = Create nvo_qrgenerator
 inv_generator.of_seterrorhandler( this, 'assemblyerror')
3. Destroy the instance variable in the close event of the window
Destroy inv_generator
4. Create a custom event on the window to use as the error handler, and display any error messages relayed by the .net assembly wrapper
MessageBox ( "Error", inv_generator.is_errortext )
With that done we're ready to add the code to call the wrapper object and put the generated QR code in the picture control:
 string          ls_text
 string          ls_base64
 blob          lblb_qrcode
 CoderObject          co
 p_1.visible = FALSE
 ls_text = sle_1.Text
 ls_base64 = inv_generator.of_generateqrcode( ls_text )
 co = create CoderObject
 lblb_qrcode = co.base64decode(ls_base64)
 destroy co
 p_1.setpicture( lblb_qrcode )
 p_1.visible = TRUE
That's it. Enter some text, click the command button and you've got a QR code
There's a bunch of options that I haven't touched on such as generating the QR code in color or adding a custom image to the center of the QR code. I'll let you explore those on your own. If you want to skip performing all these steps and just get started with the code, I've uploaded it to CodeXchange.