Parallel PowerBuilder Development with Git Worktrees and AI
Git worktrees let you keep several branches of the same PowerBuilder solution checked out at once, each in its own folder. That means you can fix a production bug, review a colleague's change and let an AI assistant build a new feature, all at the same time, without stashing, re-checking out or rebuilding anything.
Why this matters now
For most of PowerBuilder's history, a context switch was expensive. Source lived inside binary PBLs, so "switching branches" meant exporting, importing, regenerating and often a full rebuild. Most teams simply worked one issue at a time per machine.
The PowerBuilder 2025 solution format changes that. A solution (.pbsln) and its projects (.pbproj) keep every object as a plain-text source file on disk, with no PBLs at all. Compiled PBDs are build output, as they are in workspace mode. Your code now behaves like code in any other language: Git can diff it, merge it, branch it and, crucially, check out more than one copy of it.
AI coding assistants raise the stakes further. An agent such as Claude Code works by reading and editing files in a folder. Give two agents the same folder and they overwrite each other; give each its own worktree and they can work in parallel while you review the results.
What a worktree is
A worktree is an extra working folder attached to an existing Git repository, with its own branch checked out. All worktrees share one .git object store, so history, remotes and commits are common to all of them, but each folder has its own files, its own index and its own branch.
It is easiest to see against the alternatives you probably use today:
| Approach | How you switch issues | Cost for a PB solution |
|---|---|---|
One folder, git checkout |
Commit or stash, check out the other branch | Every switch touches hundreds of source files and forces a rebuild; one issue at a time |
git stash |
Park changes, switch, pop later | Easy to lose track of; still one working copy |
Second git clone |
A full separate copy | Duplicates the whole history; remotes and branches drift apart between clones |
git worktree add |
Open a different folder | One shared history; each branch stays built and ready; no switching at all |
Two rules are worth knowing up front. A branch can be checked out in only one worktree at a time, which stops you editing the same branch in two places by accident. And deleting a worktree folder does not delete its branch or its commits.
Why worktrees fit PowerBuilder 2025 solutions
The solution format is what makes worktrees practical for PowerBuilder. Each property below removes a reason PB teams used to avoid parallel branches:
- Text source, one file per object. Windows, DataWindows, user objects and functions are ordinary files. Git tracks them line by line, so a worktree is a complete, editable copy of your application.
- No PBLs, and PBDs are build output. There are no PBLs to share, and each worktree generates its own PBDs, so they never collide. Nothing binary needs to be shared or merged.
- Relative paths. A solution refers to its projects and source folders relative to the
.pbslnfile, so a copy in another folder opens and builds without edits. If your solution contains absolute paths (to shared PBDs, images or DLLs), fix those first. - One IDE per folder. You can open each worktree's
.pbslnin its own PowerBuilder IDE instance. Each instance compiles and runs its own copy, so a bug fix can be tested while a feature build is in progress elsewhere. - AI tools see plain files. An agent can read, search and edit
.srw,.sruand.srdsource directly in a worktree, then hand you a branch to review, with no PBL import or export step in between.
Setting up worktrees from the command line
The whole setup is four Git commands. The example assumes your solution lives in C:\src\SalesApp on branch main, and that you are working on issues 142 (a bug) and 157 (a feature).
-
Keep worktrees next to the main checkout, not inside it, so the IDE and Git never see one copy nested in another:
C:\src\SalesApp main checkout (main) C:\src\SalesApp-wt\142-tax-fix worktree on fix/142-tax-rounding C:\src\SalesApp-wt\157-export worktree on feature/157-excel-export -
Create a worktree with a new branch for each issue, from the main checkout:
cd C:\src\SalesApp
git fetch origin
git worktree add -b fix/142-tax-rounding ..\SalesApp-wt\142-tax-fix origin/main
git worktree add -b feature/157-excel-export ..\SalesApp-wt\157-export origin/main
For an existing branch (a colleague's change to review), leave out
-b:git worktree add ..\SalesApp-wt\review-163 feature/163-new-login. -
Open
SalesApp.pbslnin the new folder with a separate PowerBuilder IDE instance and do a full build once. From then on it builds incrementally like your main copy. -
See what you have at any time:
git worktree list
Name each folder after the issue number. When three IDE windows and three terminals are open, the folder name in the title bar is how you know which issue you are in.
Setting up worktrees in GitHub Desktop
GitHub Desktop 3.6 and later can create, switch, rename and delete worktrees without the command line. If New Worktree… is missing from the Repository menu, update GitHub Desktop first.
To create your first worktree:
- Open the SalesApp repository in GitHub Desktop.
- Choose Repository › New Worktree….
- In Worktree name, enter the issue folder name, for example
142-tax-fix. The full path appears at the bottom of the dialog; check it is where you want your worktrees to live. - In Branch name, enter
fix/142-tax-rounding. Leave it empty to create a branch with the worktree's name, or enter an existing branch to review a colleague's change. - Click Create Worktree. GitHub Desktop switches to the new worktree.
Once one worktree exists, a Current Worktree dropdown appears in the toolbar next to Current Repository and Current Branch. From it you can:
- Create more worktrees with New Worktree.
- Switch between the main worktree and your linked worktrees.
- Right-click a linked worktree to Rename… or Delete… it.
Everything else works as usual, per worktree: commit, Push origin and Create Pull Request. To open a worktree in PowerBuilder, choose Repository › Show in Explorer and double-click its .pbsln. Close that PowerBuilder IDE before you delete the worktree; if it still has uncommitted changes, GitHub Desktop warns you and offers to force the delete.
Sources: Managing worktrees in GitHub Desktop · GitHub Desktop 3.6 release note
Working with AI agents in parallel
The rule is simple: one issue, one branch, one worktree, one agent. Each agent edits only its own folder, so agents cannot overwrite each other and every change arrives as a reviewable branch.
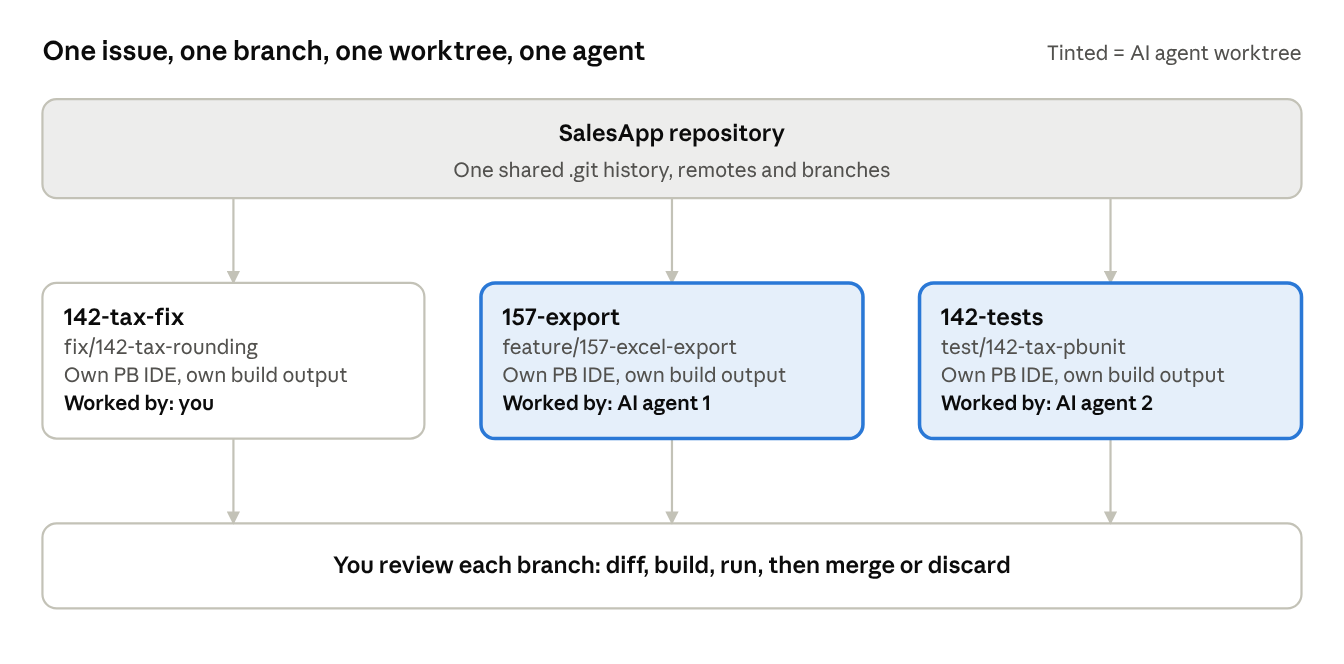 Parallel worktrees: one repository, three issues, one reviewer.
Every worktree draws on the same history but has its own files and build, and all work comes back to you as a branch.
A typical day looks like this:
- You take the hard one. Work issue 142 yourself in its worktree and IDE, where your judgement matters most.
- Hand a well-scoped issue to an agent. Start Claude Code (or your assistant of choice) in the 157 worktree with the issue text and acceptance criteria. Many AI tools can create the worktree for you; Claude Code's desktop app, for example, can start each session in its own worktree automatically.
- Let a second agent do the groundwork. Ask another agent, in a third worktree, to write PBUnit tests for the area issue 142 touches, or to document an unfamiliar object hierarchy.
- Review as branches, not as chat. When an agent finishes, read its diff in Git, open that worktree's solution, build it and run it. Accept, ask for changes, or throw the worktree away.
Prompting tips that pay off with PowerBuilder source:
- Put a
CLAUDE.md(or your tool's equivalent) at the repository root. Describe your naming conventions, ancestor objects, transaction handling and which folders hold which projects. Every worktree inherits it because it is committed. - Tell the agent which object files to start from, for example
w_order_entry.srwandn_cst_tax.sru. It saves searching and keeps the change small. - Ask the agent to keep changes inside its issue and to commit with the issue number in the message.
- Agents can edit source but cannot see the IDE. Build the worktree yourself, or give the agent a command-line build (PowerBuilder's
PBAutoBuildwith a build file) so it can check its own work.
Pitfalls and practical tips
Most problems come from things that live outside Git. Check these before you rely on parallel worktrees:
| Watch for | Why it bites | What to do |
|---|---|---|
| Build output committed to Git | Compiled PBDs and EXEs conflict on every merge | Add the build output folders and *.pbd, *.exe to .gitignore |
| Absolute paths in the solution | A worktree in another folder points back at the main copy's files | Make library and resource paths relative to the .pbsln |
| One shared database | Two branches with different schema changes break each other's tests | Give risky branches their own database, or keep schema changes to one branch at a time |
| INI files and registry settings | Connection settings and options are read from one shared place | Keep per-worktree settings in a file inside the worktree, and ignore it if it holds secrets |
| Shared DLLs, OCXs and images | They may be expected in one fixed install folder | Commit them, or document one shared location every worktree uses read-only |
| Too many at once | Each IDE instance, build and agent uses memory and your attention | Two or three active worktrees is a practical limit for most people |
| The same branch twice | Git refuses to check a branch out in a second worktree | Create a new branch per worktree, even for quick experiments |
Keep the main checkout on main and do no work there. It stays a clean reference you can build, compare against and create new worktrees from.
Merging back and cleaning up
A finished worktree goes back through your normal review process, then gets removed. Nothing about merging changes: the branch is an ordinary branch.
-
Push the branch and open a pull request, or merge it locally:
cd C:\src\SalesApp-wt\142-tax-fix git push -u origin fix/142-tax-rounding -
Close that worktree's PowerBuilder IDE first, so no files are locked, then remove the worktree:
cd C:\src\SalesApp git worktree remove ..\SalesApp-wt\142-tax-fix -
Delete the branch once it is merged, and tidy up any worktree folders you deleted by hand:
git branch -d fix/142-tax-rounding
git worktree prune
If two branches change the same object, Git merges the text source line by line, just as it would for C# or Java. Conflicts are real but readable, and an AI assistant can often resolve them for you when you explain what each branch was for.
Summary
The 2025 solution format turned PowerBuilder source into plain files, and worktrees are the payoff. Give each issue its own branch and folder, run one IDE or one AI agent per folder, and review the results as branches. You stop switching contexts and start running them side by side.